伪随机算法系列-03 Value Noise(Lattice Noise)

翻译—-Pseudorandom Noise-Value Noise
如果你觉得这篇教程不错,请去支持原作者

此教程使用的Unity版本为2020.3.6f1

  • 建立一个可视化抽象类
  • 引入一个通用的噪音生成器
  • 生成1D,2D,3D的值噪音

这是伪随机噪声系列教程的第三篇.教大家如何把可视化效果从纯hash生成的方式变成晶格(Lattice)生成的方式.
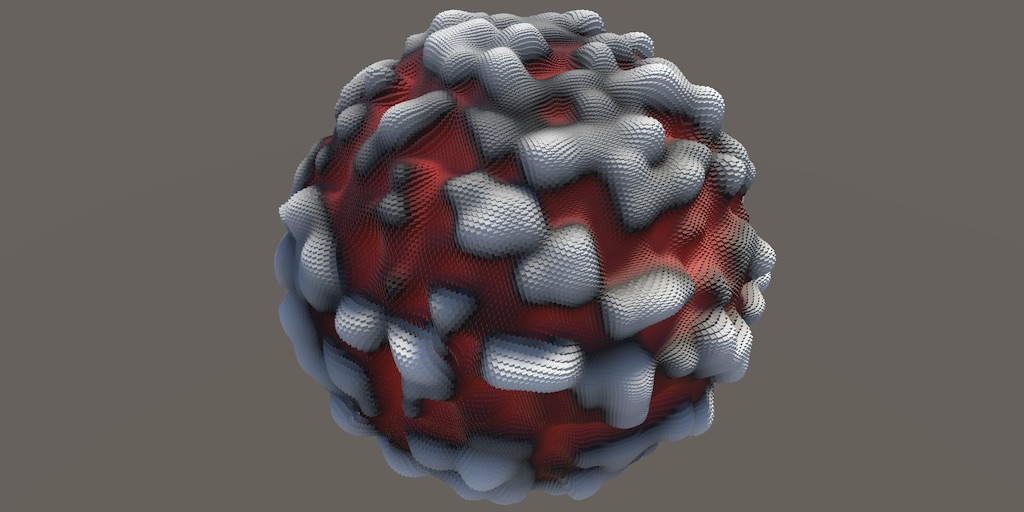
值噪音球体


1 可复用的效果(Reusable Visualization)

可视化效果展示了hash算法是如何基于整数坐标将空间划分为离散的值块.原理是噪声算法使用hash值产生了一种不连续的模式.本教程中我们将专门实现一种值噪声(ValueNoise),使hash块之间更加平滑.此算法会输出一种连续的模式,生成浮点型结果而不是bit型结果.这需要使用一种跟我们现在拥有的可视化效果有点像,但又有些不同的新算法.

我们可以复制一份HashVisualization里的代码并在新类NoiseVisualization里重用.但是这会弄出大量的重复代码.所以我们引入一个新的抽象类Visualization,通过继承来解决这个问题.

1.1 抽象基类Visualization(Abstract Visualization Class)

复制一份HashVisualization类的代码拿到Visualization类中,然后移除掉Job功能和hash算法需要的所有字段.还有hash seed和hash domain.

1
2
3
4
5
6
7
8
9
10
11
12
13
14
15
16
17
18
19
20
21
22
23
24
25
26
27
28
29
30
31
32
33
34
35
36
37
38
39
40
//using Unity.Burst;
using Unity.Collections;
using Unity.Jobs;
using Unity.Mathematics;
using UnityEngine;

using static Unity.Mathematics.math;

public class Visualization : MonoBehaviour
{
//[BurstCompile(FloatPrecision.Standard, FloatMode.Fast, CompileSynchronously = true)]
//struct HashJob : IJobFor { … }


//private static int hashesId = Shader.PropertyToID("_Hashes");
private static int positionsId = Shader.PropertyToID("_Positions");
private static int normalsId = Shader.PropertyToID("_Normals");
private static int configId = Shader.PropertyToID("_Config");


//[SerializeField]
//int seed;

//[SerializeField]
//SpaceTRS domain = new SpaceTRS
//{
//scale = 8f
//};

//NativeArray<uint4> hashes;

NativeArray<float3x4> positions, normals;

//ComputeBuffer hashesBuffer, positionsBuffer, normalsBuffer;
ComputeBuffer positionsBuffer, normalsBuffer;


}

移除掉OnEnableOnDisable里对应的地方.

1
2
3
4
5
6
7
8
9
10
11
12
13
14
15
16
17
18
19
20
21
22
23
24
25
26
27
28
29
30
void OnEnable()
{
isDirty = true;
int length = resolution * resolution;
length = length / 4 + (length & 1);

//hashes = new NativeArray<uint4>(length, Allocator.Persistent);
positions = new NativeArray<float3x4>(length, Allocator.Persistent);
normals = new NativeArray<float3x4>(length, Allocator.Persistent);
//hashesBuffer = new ComputeBuffer(length * 4, 4);
positionsBuffer = new ComputeBuffer(length * 4, 3 * 4);
normalsBuffer = new ComputeBuffer(length * 4, 3 * 4);

propertyBlock ??= new MaterialPropertyBlock();
//propertyBlock.SetBuffer(hashesId, hashesBuffer);

}

void OnDisable()
{
//hashes.Dispose();
positions.Dispose();
normals.Dispose();
//hashesBuffer.Release();
positionsBuffer.Release();
normalsBuffer.Release();
//hashesBuffer = null;
positionsBuffer = null;
normalsBuffer = null;
}

然后移除掉Update中hash job的调度方法和hash buffer的设置方法.

1
2
3
4
5
6
7
8
9
10
11
12
13
14
15
16
17
void Update()
{
if (isDirty || transform.hasChanged)
{


//new HashJob
//{
// …
//}.ScheduleParallel(hashes.Length, resolution, handle).Complete();

//hashesBuffer.SetData(hashes.Reinterpret<uint>(4 * 4));

}


}

这个类包含所有可视化所需的抽象信息数据,但是不包含算法和字段数据.因此这个类本身是没有任何作用的,也不可以被挂载到Unity的GameObject组件上,应该把它设置成abstract.

1
public abstract class Visualization : MonoBehaviour { … }

这样任何人都无法直接创建此类的实例了.

1.2 抽象方法(Abstract Methods)

无论我们怎么使用可视化效果,它必须要支持启用和禁用功能.现在已经有了OnEnableOnDisable函数,但是它们没有包含创建和移除NativeArray,Buffers和任何与有关数据的功能.我们假设把这些工作放到Visualization类中的EnableVisualizationDisableVisualization中来完成.这两个方法中并不需要任何代码,所以把它们声明为abstract,就像一个接口.因为此类是抽象类,所以这样声明并省略掉代码部分而不会报错.

1
2
3
abstract void EnableVisualization();

abstract void DisableVisualization();

当启用一个可视化效果时,需要数据长度以及材质属性块作为参数,所以我们向EnableVisualization添加下列形参.

1
abstract void EnableVisualization(int dataLength, MaterialPropertyBlock propertyBlock);

OnEnable中调用一次EnableVisualization方法.在OnDisable中调用一次DisableVisualization方法.

1
2
3
4
5
6
7
8
9
10
11
12
13
14
void OnEnable()
{


propertyBlock ??= new MaterialPropertyBlock();
EnableVisualization(length, propertyBlock);

}

void OnDisable()
{

DisableVisualization();
}

在更新可视化效果的时候,我们还需要做一些工作,不过现在并不能确定是什么.所以先加一个抽象方法UpdateVisualization,形参为位置点的NativeArray<**float3x4**>,resolution以及Joh的handle.

1
abstract void UpdateVisualization(NativeArray<float3x4> positions, int resolution, JobHandle handle);

Update中调用此方法,传入一个shapeJobs里的数据作为handle.

1
2
3
4
5
6
7
8
9
10
//JobHandle handle = shapeJobs[(int)shape](positions, normals, resolution, transform.localToWorldMatrix, default);
UpdateVisualization(
positions,
resolution,
shapeJobs[(int)shape]
(
ositions, normals, resolution,
transform.localToWorldMatrix, default
)
);

现在必须让具体的实例类重写这些接口来提供他们自己的操作流程.但是目前还不行,因为它们的访问权限是private,我们可以把他们变成public,但是没有必要,因为只有这个类本身会使用这些方法.所以我们把访问权限设置为protected,这样就只有此类本身和它的子类可以使用这些方法了.

1
2
3
4
5
protected abstract void EnableVisualization(int dataLength, MaterialPropertyBlock propertyBlock);

protected abstract void DisableVisualization();

protected abstract void UpdateVisualization(NativeArray<float3x4> positions, int resolution, JobHandle handle);

1.3 继承抽象基类(Extending an Abstract Class)

现在修改下HashVisualization类的代码使其继承于Visualization而不是MonoBehaviour,从而继承了所有通用的可视化功能.

1
public class HashVisualization : Visualization { … }

移除内部类Shape还有所有HashVisualization里定义的字段,因为已经继承了.

1
2
3
4
5
6
7
8
9
10
11
12
13
14
15
16
17
18
19
20
21
22
23
24
25
26
27
28
29
30
31
32
//public enum Shape { Plane, Sphere, Torus }

//static Shapes.ScheduleDelegate[] shapeJobs = { … };

static int hashesId = Shader.PropertyToID("_Hashes");
//positionsId = Shader.PropertyToID("_Positions"),
//normalsId = Shader.PropertyToID("_Normals"),
//configId = Shader.PropertyToID("_Config");

//…

[SerializeField]
int seed;

[SerializeField]
SpaceTRS domain = new SpaceTRS
{
scale = 8f
};

NativeArray<uint4> hashes;

//NativeArray<float3x4> positions, normals;

//ComputeBuffer hashesBuffer, positionsBuffer, normalsBuffer;
ComputeBuffer hashesBuffer;

//MaterialPropertyBlock propertyBlock;

//bool isDirty;

//Bounds bounds;

OnEnable函数改成EnableVisualization,删掉所有的代码只保留与hash只计算有关的.

1
2
3
4
5
6
7
8
9
10
11
12
13
14
void EnableVisualization(int dataLength, MaterialPropertyBlock propertyBlock)
{
//…
hashes = new NativeArray<uint4>(dataLength, Allocator.Persistent);
//positions = new NativeArray<float3x4>(length, Allocator.Persistent);
//normals = new NativeArray<float3x4>(length, Allocator.Persistent);
hashesBuffer = new ComputeBuffer(dataLength * 4,4);
//positionsBuffer = new ComputeBuffer(length * 4, 3 * 4);
//normalsBuffer = new ComputeBuffer(length * 4, 3 * 4);

//propertyBlock ??= new MaterialPropertyBlock();
propertyBlock.SetBuffer(hashesId, hashesBuffer);
//…
}

我们必须使用override关键字明确指出这个方法是重写它继承的基类的,它的访问权限也必须与基类相同.

1
protected override void EnableVisualization(int dataLength, MaterialPropertyBlock propertyBlock) { … }

对应的,把OnDisable改成DisableVisualization.

1
2
3
4
5
6
7
8
9
10
11
12
protected override void DisableVisualization()
{
hashes.Dispose();
//positions.Dispose();
//normals.Dispose();
hashesBuffer.Release();
//positionsBuffer.Release();
//normalsBuffer.Release();
hashesBuffer = null;
//positionsBuffer = null;
//normalsBuffer = null;
}

删掉整个OnValidate,因为基类中已经有了.

1
//void OnValidate () { … }

最后把Update方法改成UpdateVisualization,只做调度和计算hash值的工作,然后把输入填入缓冲区.

1
2
3
4
5
6
7
8
9
10
11
12
13
14
protected override void UpdateVisualization(NativeArray<float3x4> positions, int resolution, JobHandle handle)
{
//…
new HashJob
{
positions = positions,
hashes = hashes,
hash = SmallXXHash.Seed(seed),
domainTRS = domain.Matrix
}.ScheduleParallel(hashes.Length, resolution, handle).Complete();

hashesBuffer.SetData(hashes.Reinterpret<uint>(4 * 4));
//…
}

现在我们的可视化Hash程序依然可以正常工作,只是通用的代码都已经提到Visualization类中了.

1.4 可视化噪声(Visualizing Noise)

现在新建一个继承VisualizationNoiseVisualization类.复制一份HashVisualization的代码,移除掉里面的hashjob功能,把里面所有对hash的引用改成对noise的引用.由于噪声是由浮点数组成,所以需要把NativeArray的类型改为float4.目前的UpdateVisualization方法只做handle.Complete和设置噪声缓冲区的操作.此时会产生一个只有0的噪声效果.

1
2
3
4
5
6
7
8
9
10
11
12
13
14
15
16
17
18
19
20
21
22
23
24
25
26
27
28
29
30
31
32
33
34
35
36
37
38
39
40
41
42
43
44
45
46
47
48
49
50
51
52
53
54
//using Unity.Burst;
using Unity.Collections;
using Unity.Jobs;
using Unity.Mathematics;
using UnityEngine;

//using static Unity.Mathematics.math;

public class NoiseVisualization : Visualization
{

//[BurstCompile(FloatPrecision.Standard, FloatMode.Fast, CompileSynchronously = true)]
//struct HashJob : IJobFor { … }

static int noiseId = Shader.PropertyToID("_Noise");

[SerializeField]
int seed;

[SerializeField]
SpaceTRS domain = new SpaceTRS
{
scale = 8f
};

NativeArray<float4> noise;

ComputeBuffer noiseBuffer;

protected override void EnableVisualization(int dataLength, MaterialPropertyBlock propertyBlock)
{
noise = new NativeArray<float4>(dataLength, Allocator.Persistent);
noiseBuffer = new ComputeBuffer(dataLength * 4, 4);
propertyBlock.SetBuffer(noiseId, noiseBuffer);
}

protected override void DisableVisualization()
{
noise.Dispose();
noiseBuffer.Release();
noiseBuffer = null;
}

protected override void UpdateVisualization(NativeArray<float3x4> positions, int resolution, JobHandle handle)
{
//new HashJob
//{
//…
//}.ScheduleParallel(hashes.Length, resolution, handle).Complete();

handle.Complete();
noiseBuffer.SetData(noise.Reinterpret<float>(4 * 4));
}
}

噪声的可视化效果需要一个不同的Shader.复制一份HashGPU的代码并改名为NoiseGPU.用noiseBuffer替换hashBuffer,并且直接使用noise的值在ConfigureProcedural里修正位置.这样做是没有问题的,因为噪声值将在[-1,1]之间.

1
2
3
4
5
6
7
8
9
10
11
12
13
14
15
16
#if defined(UNITY_PROCEDURAL_INSTANCING_ENABLED)
StructuredBuffer<float> _Noise;
StructuredBuffer<float3> _Positions, _Normals;
#endif

float4 _Config;

void ConfigureProcedural()
{
#if defined(UNITY_PROCEDURAL_INSTANCING_ENABLED)

unity_ObjectToWorld._m03_m13_m23 +=
_Config.z * _Noise[unity_InstanceID] * _Normals[unity_InstanceID];
unity_ObjectToWorld._m00_m11_m22 = _Config.y;
#endif
}

然后用GetNoiseColor方法代替GetHashColor,并且如果是正数就直接返回噪音值来产生一个灰度值.如果是负数我们就返回一个红色值,这样就能轻易区分正负的效果.

1
2
3
4
5
6
7
8
9
10
11
12
13
14
15
16
17
18
19
20
21
float3 GetNoiseColor()
{
#if defined(UNITY_PROCEDURAL_INSTANCING_ENABLED)
float noise = _Noise[unity_InstanceID];
return noise < 0.0 ? float3(-noise, 0.0, 0.0) : noise;
#else
return 1.0;
#endif
}

void ShaderGraphFunction_float(float3 In, out float3 Out, out float3 Color)
{
Out = In;
Color = GetNoiseColor();
}

void ShaderGraphFunction_half(half3 In, out half3 Out, out half3 Color)
{
Out = In;
Color = GetNoiseColor();
}

为噪声创建一个新的ShaderGraph文件或者SurfaceShader,复制一份hashshader的代码进去.如果你是用的surfaceshader你还必须改一下颜色函数的调用.然后创建一个材质参数,并且把整个NoiseVisualization挂载到GameObject上.
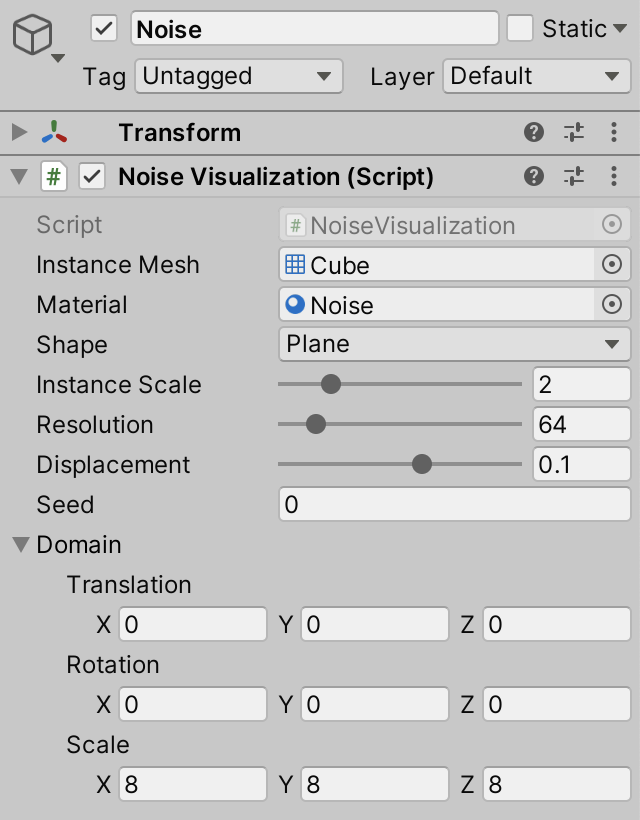
噪音生成器对象

我把hash和nosie的可视化功能分别建立在单独的场景中,但你也可以放在同一个场景中,但是只能启用其中一个.

1.5 重写继承的方法(Extension Methods)

一旦创建了计算噪声的Job,我们将有三个地方需要执行向量化的矩阵-向量变换.与其引入TransformPositionsTransformVectors的另一个实例,不如让我们把这段代码放在一个通用的地方.最简单的方法是创建一个静态类MathExtensions,它包含一个Shapes.Job类中TransformVectors方法的公共静态副本.

1
2
3
4
5
6
7
8
9
10
11
12
using Unity.Mathematics;

using static Unity.Mathematics.math;

public static class MathExtensions
{
public static float4x3 TransformVectors(float3x4 trs, float4x3 p, float w = 1f) => float4x3(
trs.c0.x * p.c0 + trs.c1.x * p.c1 + trs.c2.x * p.c2 + trs.c3.x * w,
trs.c0.y * p.c0 + trs.c1.y * p.c1 + trs.c2.y * p.c2 + trs.c3.y * w,
trs.c0.z * p.c0 + trs.c1.z * p.c1 + trs.c2.z * p.c2 + trs.c3.z * w
);
}

现在我们在任何地方使用MathExtensions.TransformVectors(trs,v).在使用了using static MathExtensions后,写法可以简化为TransformVectors(trs,v).不过,还有一种方法是将其转换为扩展方法.

扩展方法是一个静态方法,它假装是一个类型的实例方法.通过将this修饰符添加到方法的第一个参数来创建.

1
public static float4x3 TransformVectors (this float3x4 trs, float4x3 p, float w = 1f) => float4x3(…);

然后可以在该类型的实例上直接调用该方法,省略它的第一个参数,因此写为trs.TransformVectors(v).修改一下Shapes.Job里对应的地方.

1
2
3
4
5
6
7
8
9
10
11
//float4x3 TransformVectors (float3x4 trs, float4x3 p, float w = 1f) => float4x3(…);

public void Execute(int i)
{
Point4 p = default(S).GetPoint4(i, resolution, invResolution);

positions[i] = transpose(positionTRS.TransformVectors(p.positions));

float3x4 n = transpose(normalTRS.TransformVectors(p.normals, 0f));
normals[i] = float3x4(normalize(n.c0), normalize(n.c1), normalize(n.c2), normalize(n.c3));
}

HashVisualization.HashJob里也做对应的修改.

1
2
3
4
5
6
7
//float4x3 TransformPositions (float3x4 trs, float4x3 p) => float4x3(…);

public void Execute(int i)
{
float4x3 p = domainTRS.TransformVectors(transpose(positions[i]));

}

让我们为MathExtensions添加另一个扩展方法Get3x4,用它来提取float4x4矩阵的float3x4部分.

1
public static float3x4 Get3x4(this float4x4 m) => float3x4(m.c0.xyz, m.c1.xyz, m.c2.xyz, m.c3.xyz);
How do extension methods work?

If you go deep enough, there are no such things as objects. There is just data, some of which represents information and some of which represents instructions. Objects are an abstraction. When invoking a method on an object what really happens is that the CPU pushes some data—the arguments—on a data stack and then jumps to the relevant instructions. The object on which the method was invoked is just another argument. An extension method makes this explicit.


2 晶格噪声(Lattice Noise)

我们将在本教程中创建的噪声被称为值噪声.这是一种特殊类型的晶格噪声,它基于几何晶格,通常是一个规则的网格.

2.1 泛型噪声生成器(Generic Noise Job)

因为噪声的样子千奇百怪,所以我们将创建一个专用的静态噪声类,就像创建形状生成器时一样.它包含一个接口和一个通用的Job结构类型.在这里,接口是INoise,它定义了一个GetNoise4函数,该函数利用位置和hash值算出一个向量化float4类型的noise值.

1
2
3
4
5
6
7
8
9
10
11
12
13
14
15
16
17
using Unity.Burst;
using Unity.Collections;
using Unity.Jobs;
using Unity.Mathematics;

using static Unity.Mathematics.math;

public static class Noise
{
public interface INoise
{
float4 GetNoise4(float4x3 positions, SmallXXHash4 hash);
}

[BurstCompile(FloatPrecision.Standard, FloatMode.Fast, CompileSynchronously = true)]
public struct Job<N> : IJobFor where N : struct, INoise {}
}

该Job类使用位置数据作为输入,计算出噪声并输出,因此还需要一个hash值和域的变换矩阵.在Execute函数里调用Noise类的GetNoise4方法,并将转置后的位置数据,以及hash值传递给它.

1
2
3
4
5
6
7
8
9
10
11
12
13
14
15
16
17
public struct Job : IJobFor where N : struct, INoise
{
[ReadOnly]
public NativeArray<float3x4> positions;

[WriteOnly]
public NativeArray<float4> noise;

public SmallXXHash4 hash;

public float3x4 domainTRS;

public void Execute(int i)
{
noise[i] = default(N).GetNoise4(domainTRS.TransformVectors(transpose(positions[i])), hash);
}
}

最后,在Job中添加一个对应的ScheduleParallel方法,再添加一个对应Noise的委托函数.

1
2
3
4
5
6
7
8
9
10
11
12
13
14
15
16
17
18
19
20
21
22
23
24
25
public struct Job<N> : IJobFor where N : struct, INoise
{

public static JobHandle ScheduleParallel(
NativeArray<float3x4> positions,
NativeArray<float4> noise,
int seed, SpaceTRS trs,
int resolution,
JobHandle dependency) =>
new Job<N>
{
positions = positions,
noise = noise,
hash = SmallXXHash.Seed(seed),
domainTRS = domainTRS.Matrix,
}.ScheduleParallel(positions.Length, resolution, dependency);

public delegate JobHandle ScheduleDelegate(
NativeArray<float3x4> positions,
NativeArray<float4> noise,
int seed,
SpaceTRS trs,
int resolution,
JobHandle dependency
);

2.2 Partial Classes

下一步是将lattice noise的代码添加到Noise类中,但不是将它们都放在同一个c#文件里,而是将lattice-specific部分的代码放在一个单独的文件中,以保持代码整洁.这可以通过将Noise类转换为Partial类来实现.这将告诉编译器Noise类的内容被拆分成多个文件.

1
public static partial class Noise { … }

为了简单起见,我们先从1D噪声开始.创建一个新的c#文件并将其命名为Noise.Lattice.不过这种命名方式不是强制的,只是为了明确地指明此文件包含了NoiseLattice部分.我们再次定义partial Noise类,这次添加了一个Lattice1D结构体,现在它总是返回零.

1
2
3
4
5
6
7
8
9
10
11
12
13
14
using Unity.Mathematics;

using static Unity.Mathematics.math;

public static partial class Noise
{
public struct Lattice1D : INoise
{
public float4 GetNoise4(float4x3 positions, SmallXXHash4 hash)
{
return 0f;
}
}
}

现在我们可以在NoiseVisualization中创建一个1D的lattice噪声效果了.

1
2
3
4
5
6
7
8
9
10
11
12
13
14


using static Noise;

public class NoiseVisualization : Visualization
{


protected override void UpdateVisualization(NativeArray<float3x4> positions, int resolution, JobHandle handle)
{
Job<Lattice1D>.ScheduleParallel(positions, noise, seed, domain, resolution, handle).Complete();
noiseBuffer.SetData(noise);
}
}

2.3 1D噪声(1D Noise)

创建1D噪声的第一步就是用Lattice1D.GetNoise4函数来计算整数坐标X的hash值,将整数的第一个字节的数据转换为float,再将其范围转换为[−1,1].因此,先floor第一列的坐标,用于hash计算,再其转换为uint4,接着使用255作为掩码计算出第一个字节的数据并将其转换为浮点值,最后重新计算范围.

1
2
3
4
5
6
public float4 GetNoise4(float4x3 positions, SmallXXHash4 hash)
{
int4 p = (int4)floor(positions.c0);
float4 v = (uint4)hash.Eat(p) & 255;
return v * (2f / 255f) - 1f;
}

1D晶格点的hash值效果;域缩放值8.

这一步就忽略掉了数据的小数部分,只计算了整数部分的hash数据.为了使噪声平滑和连续,我们必须在整数坐标之间做混合处理.晶格点是处于整数位置上的,在这些点之间的小数空间是空的,必须用连续的噪声数据来填满它们.为了完成这个功能,我们需要知道空白空间两端两个点的值.

1D-lattice线的概念

我们把当前的点命名为p0,加一个单位的点命名为p1.p1的可视化效果跟p0差不多,只是移动了一个单位而已.

1
2
3
int4 p0 = (int4)floor(positions.c0);
int4 p1 = p0 + 1;
float4 v = (uint4)hash.Eat(p1) & 255;

下一个晶格点上的可视化效果

To fill the span between the lattice points we need to combine both values, which means that we’ll have to convert hashes to floating-point values twice. To simplify code that needs bytes or floating-points values let’s add two properties to SmallXXHash4, one to retrieve the first vectorized byte—designated as bytes A—and one to retrieve the same data but converted to a value in the 0–1 range.

为了填充两点之间的空白,我们需要合并这两个值,这意味着必须进行两次hash值转换浮点值.为了简化需要写的代码,让我们向SmallXXHash4添加两个属性,一个用于计算向量化数据的第一个字节,另一个用于把前一个数据转换到[0,1]之间.

1
2
3
public uint4 BytesA => (uint4)this & 255;

public float4 Floats01A => (float4)BytesA * (1f / 255f);

现在我们可以通过上面的方法轻松地得到范围是[0,1]的p0和p1两个点的hash值,然后在GetNoise4里做如下操作,就能得到[−1,1]范围内两个点之间的平均值.

1
2
//float4 v = (uint4)hash.Eat(p0) & 255;
return hash.Eat(p0).Floats01A + hash.Eat(p1).Floats01A - 1f;

两点之间的平均值

使用0.5为系数的插值算法也能得到同样的值.但是要记得在减1之前先乘2

1
return lerp(hash.Eat(p0).Floats01A, hash.Eat(p1).Floats01A, 0.5f) * 2f - 1f;

最后,为了得到一个基于晶格坐标的,介于p0到p1之间的,连续的插值系数,需要用到的坐标小数部分的数据.可以通过从当前坐标中减去p0来得到,称之为t.

1
2
float4 t = positions.c0 - p0;
return lerp(hash.Eat(p0).Floats01A, hash.Eat(p1).Floats01A, t) * 2f - 1f;

优化插值之后的效果

让我们将剩余3个字节的提取以及后续0-1计算的函数添加到SmallXXHash4方便以后使用.

1
2
3
4
5
6
7
8
9
10
11
12
13
14
15
public uint4 BytesA => (uint4)this & 255;

public uint4 BytesB => ((uint4)this >> 8) & 255;

public uint4 BytesC => ((uint4)this >> 16) & 255;

public uint4 BytesD => (uint4)this >> 24;

public float4 Floats01A => (float4)BytesA * (1f / 255f);

public float4 Floats01B => (float4)BytesB * (1f / 255f);

public float4 Floats01C => (float4)BytesC * (1f / 255f);

public float4 Floats01D => (float4)BytesD * (1f / 255f);

2.4 2D噪声(2D Noise)

现在我们有了连续的1D噪声,尽管它还不是那么的平滑.在考虑优化平滑效果之前,让我们先做一个简单的2D噪音.

当只考虑一个维度时,我们需要跟踪两个晶格点和一个插值系数.让我们为该数据定义一个LatticeSpan4结构体.因为此类是晶格噪声专用的,所以只用private就行了.把它放到Noise.Latticewe文件中.

1
2
3
4
5
private struct LatticeSpan4
{
public int4 p0, p1;
public float4 t;
}

接下来,添加一个静态GetLatticeSpan4函数,此函数利用一组1D坐标作为参数.

1
2
3
4
5
6
7
8
9
private static LatticeSpan4 GetLatticeSpan4(float4 coordinates)
{
float4 points = floor(coordinates);
LatticeSpan4 span;
span.p0 = (int4)points;
span.p1 = span.p0 + 1;
span.t = coordinates - points;
return span;
}

接下来简化Lattice1D.GetNoise4函数的代码.

1
2
3
4
5
public float4 GetNoise4(float4x3 positions, SmallXXHash4 hash)
{
LatticeSpan4 x = GetLatticeSpan4(positions.c0);
return lerp(hash.Eat(x.p0).Floats01A, hash.Eat(x.p1).Floats01A, x.t) * 2f - 1f;
}

新建一个Lattice2D类,先复制Lattice1D的代码用.

1
2
3
public struct Lattice1D : INoise { … }

public struct Lattice2D : INoise { … }

修改NoiseVisualization.UpdateVisualization里的代码,将泛型类型数据改为Lattice2D.

1
Job<Lattice2D>.ScheduleParallel(positions, noise, seed, domain, resolution, handle).Complete();

现在修改一下Lattice2D.GetNoise4函数,同时处理Z方向上的lattice数据,然后用z变量里的数据来计算噪音.

1
2
3
4
5
6
7
public float4 GetNoise4(float4x3 positions, SmallXXHash4 hash)
{
LatticeSpan4 x = GetLatticeSpan4(positions.c0);
LatticeSpan4 z = GetLatticeSpan4(positions.c2);

return lerp(hash.Eat(z.p0).Floats01A, hash.Eat(z.p1).Floats01A, z.t) * 2f - 1f;
}

这将会产生和以前一样的效果,不过现在是在Z轴上而不是X轴上.我们也可以用Y轴,但这在XZ平面上看不到效果,除非我们旋转一下域的方向.
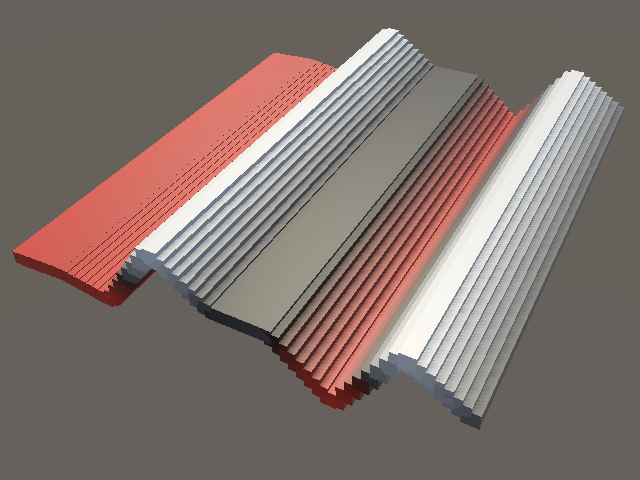
X轴和Z轴上的插值效果.

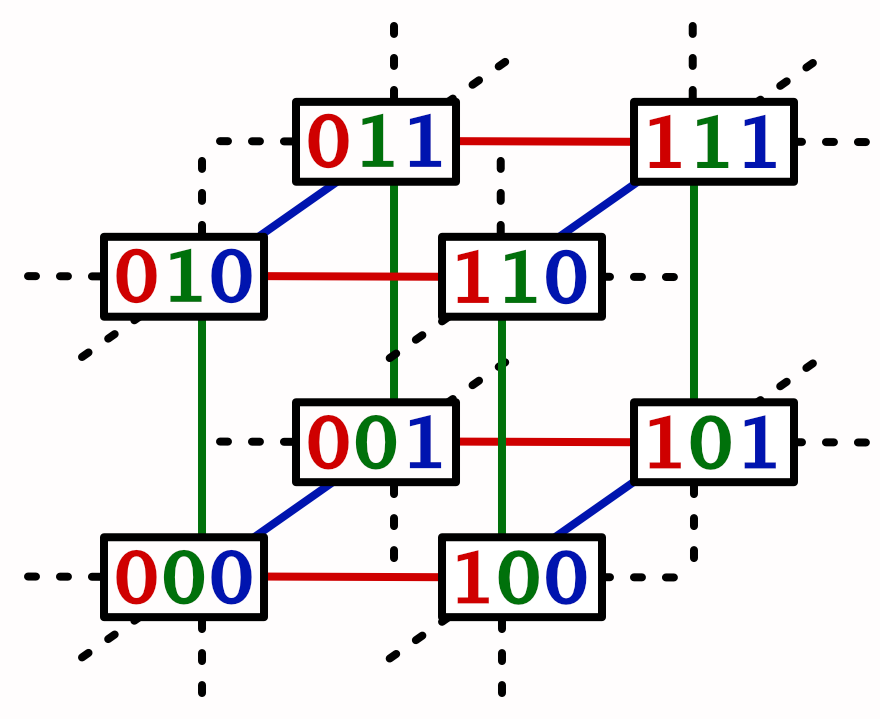
为了创建一个依赖于X轴和Z轴的效果,我们必须同时考虑这两个维度,于是可以得到一个方形的晶格,方形的四个角上有各自的hash值.
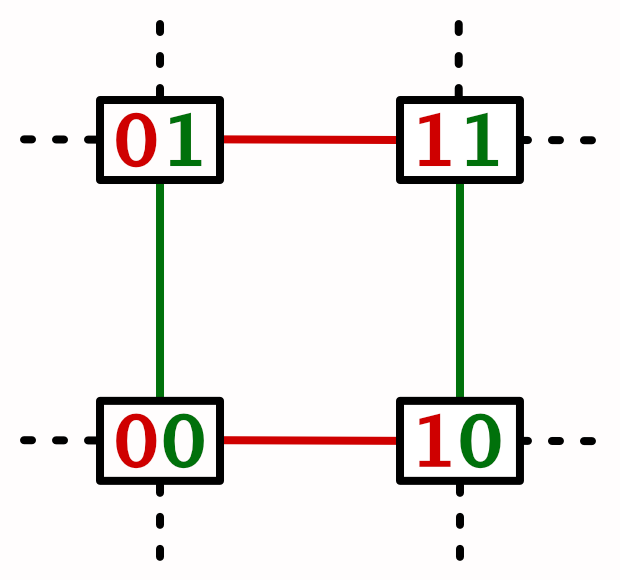
2D晶格方块

让我们先计算X轴上的hash值,成为h0和h1.

1
2
3
4
5
LatticeSpan4 x = GetLatticeSpan4(positions.c0);
LatticeSpan4 z = GetLatticeSpan4(positions.c2);

SmallXXHash4 h0 = hash.Eat(x.p0);
SmallXXHash4 h1 = hash.Eat(x.p1);

然后将Z喂给h0,而不是原始hash值.

1
return lerp(h0.Eat(z.p0).Floats01A, h0.Eat(z.p1).Floats01A, z.t) * 2f - 1f;

沿着X轴向上的带状效果

正如看到的那样,我们现在的噪声效果是基于单独的X轴以及Z轴上两点的插值计算得来的,它沿着Z轴是带状连续,但是沿着X轴是不连续的.为了让整个图形连续,我们必须在X轴上的h0和h1之间进行插值.所以我们要对两个线性插值进行线性插值,这被成为双线性插值算法.

1
2
3
4
return lerp(
lerp(h0.Eat(z.p0).Floats01A, h0.Eat(z.p1).Floats01A, z.t),
lerp(h1.Eat(z.p0).Floats01A, h1.Eat(z.p1).Floats01A, z.t),
x.t) * 2f - 1f;

双线性插值

2.5 平滑噪声(Smooth Noise)

虽然我们有一个连续的2D图形,但它还不是那么的平滑.晶格点之间是平直的线段,因此在晶格方块的边缘采样计算时,方向会发生突然的变化.为了使其平滑,我们需要考虑噪声的变化率.假设我们有一个函数,那么它的一阶导数就是它的变化率.当线性插值的函数曲线是一条直线时,所以它的导数是一个常数.此外还有二阶导数,它是一阶导数的导数.你可以把它想象成曲率的变化率,或者噪声的加速度.对于线性插值来说,它的二阶导数总是为0.

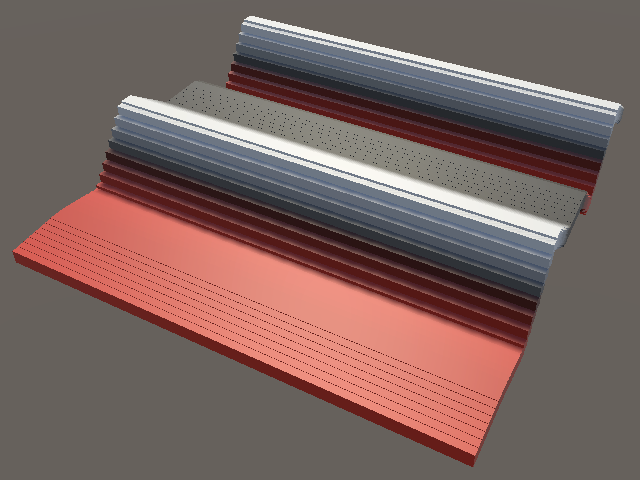
例如,在下图中,一维噪声用黑色实线表示,其一阶导数为橙色虚线,二阶导数为紫色虚线.这里为了方便观察将导数整体除以了6.可以看到在晶格点的中间,橙色线断开了,说明噪声在此点突然改变了方向.
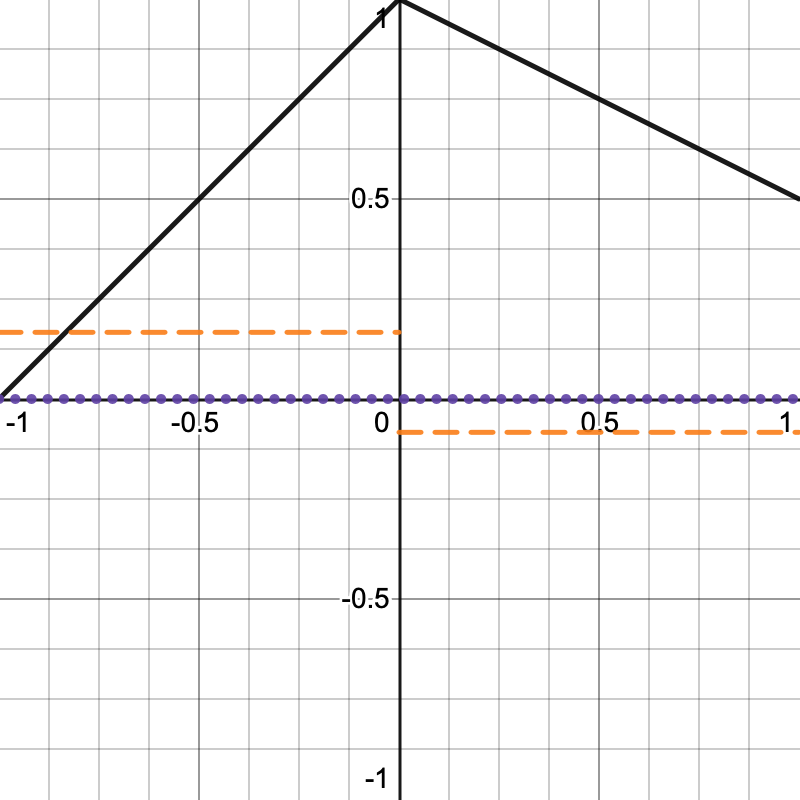
0到1之间的函数曲线,包括0.5

GetLatticeSpan4函数中用smoothstep函数平滑插值系数.

1
2
span.t = coordinates - points;
span.t = smoothstep(0f, 1f, span.t);

平滑插值

使用smoothstep函数是可行的,即$-3t^2−2t^3$,它在输入值是0和1的时候,这两点的切线是水平的(也就是变化率为0).这意味着它的一阶导数$-6t−6t^2$在两端(0和1)都是0,所以它是C1连续,但是我们的线性插值只是C0连续.然而,这对于它的二阶导数$-6−12t$来说是不对的,所以它不是C2连续.
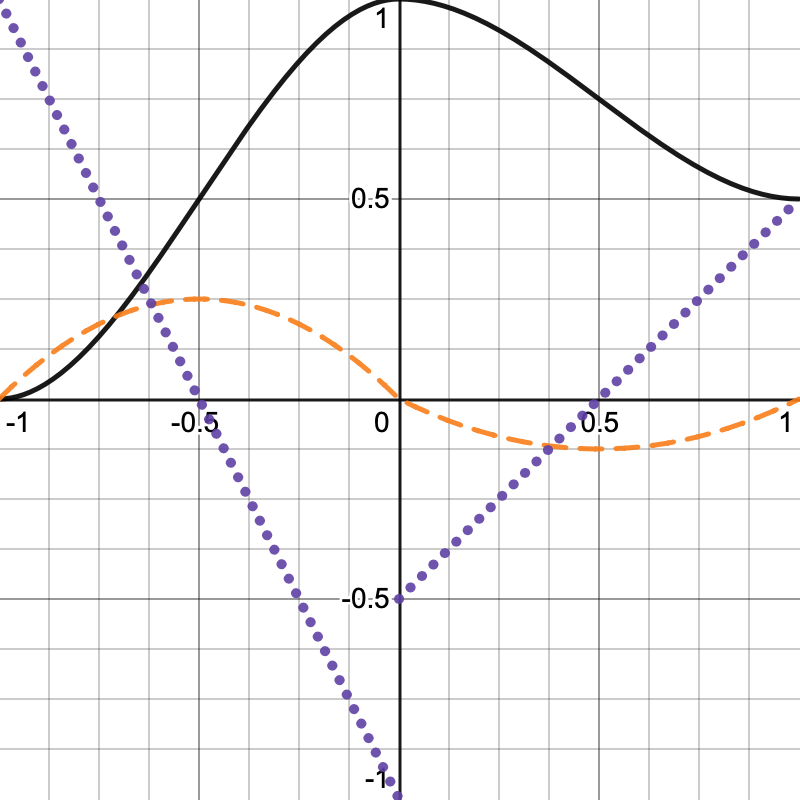
`Smoothstep`替换线性插值

如何求函数导数

记住一个概念,即$ax^b$的导数是$abx^{b-1}$,常数的导数是0.这也同样适用于函数的每一个部分.

比如,$4x^3+5x−2$的导数是$12x^2+5$.

2.6 二阶连续性(Second-Order Continuity)

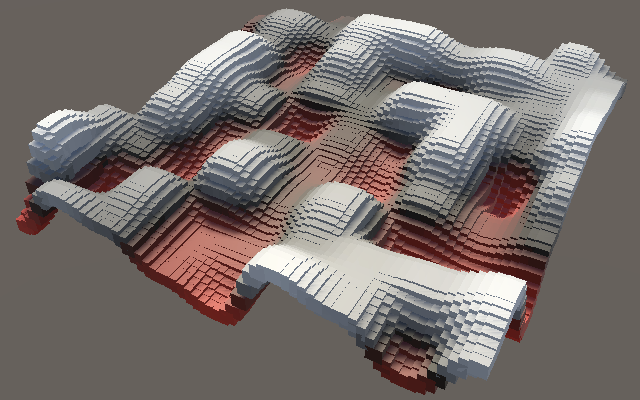
虽然smoothstepC1-连续的,但这个函数的导数是不连续的.这意味着它的变化率在晶格的两端是不同的.在采用基于点生成的可视化效果时,缺陷不是很明显,但当噪声用于计算光滑的网格表面或法线贴图时,这种不连续就会像折痕一样非常明显.为了避免这种情况,必须更进一步,找到一个C2-连续的函数,因此我们可以使用$6t^5−15t^4+10t^3$.它的一阶导数是$30t^4-60t^3+30t^2$,它的二阶导数是$120t^3-180t^2+60t$.当输入为0和1时,结果都为零.
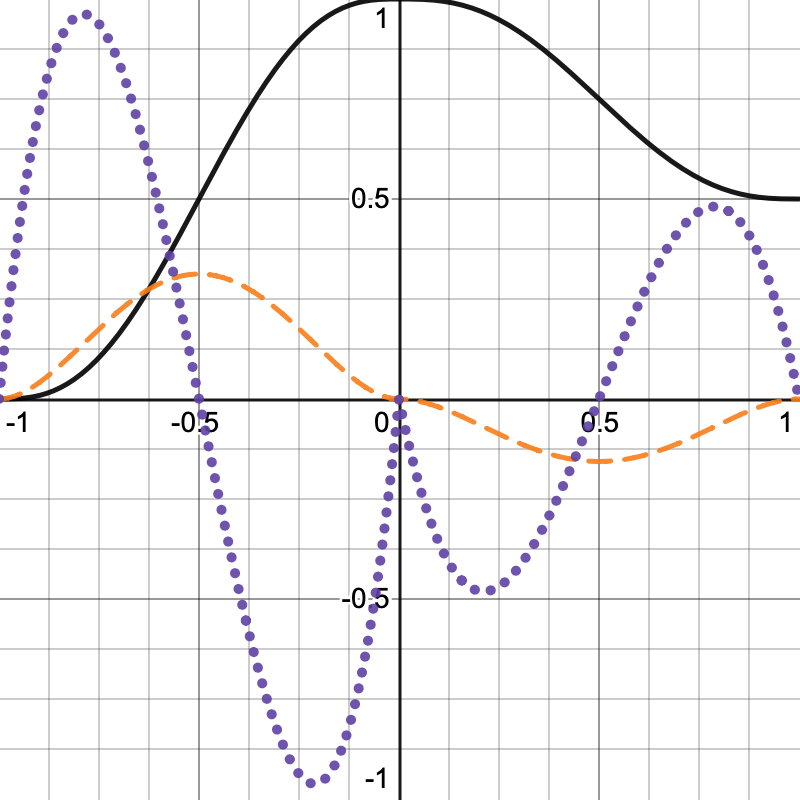
二阶连续函数替代`Smoothstep`

修改一下GetLatticeSpan4函数里的代码,我们可以重新组织一下函数,将其变为$ttt(t(t6−15)+10)$.

1
2
span.t = coordinates - points;
span.t = span.t * span.t * span.t * (span.t * (span.t * 6f - 15f) + 10f);

C2连续的插值效果


3 3D噪声(3D Noise)

最后我们添加3D噪声.

3D晶格方块

复制一份Lattice2D的代码来创建Lattice3D,并计算Y轴的晶格数据.然后还要跟踪XY平面上的四个点的hash值.

1
2
3
4
5
6
7
8
9
10
11
12
13
14
15
16
17
public struct Lattice3D : INoise
{
public float4 GetNoise4(float4x3 positions, SmallXXHash4 hash)
{
LatticeSpan4
x = GetLatticeSpan4(positions.c0),
y = GetLatticeSpan4(positions.c1),
z = GetLatticeSpan4(positions.c2);

SmallXXHash4
h0 = hash.Eat(x.p0), h1 = hash.Eat(x.p1),
h00 = h0.Eat(y.p0), h01 = h0.Eat(y.p1),
h10 = h1.Eat(y.p0), h11 = h1.Eat(y.p1);

return lerp(…) * 2f - 1f;
}
}

修改返回值,沿X轴在YZ平面上进行两个插值计算.

1
2
3
4
5
6
7
8
9
10
return lerp(
lerp(
lerp(h00.Eat(z.p0).Floats01A, h00.Eat(z.p1).Floats01A, z.t),
lerp(h01.Eat(z.p0).Floats01A, h01.Eat(z.p1).Floats01A, z.t),
y.t),
lerp(
lerp(h10.Eat(z.p0).Floats01A, h10.Eat(z.p1).Floats01A, z.t),
lerp(h11.Eat(z.p0).Floats01A, h11.Eat(z.p1).Floats01A, z.t),
y.t),
x.t) * 2f - 1f;

最后,创建添加一个静态数组和一个滑块属性来做动态噪声选择器.

1
2
3
4
5
6
7
8
9
10
11
12
13
14
15
16
17
18
19
static ScheduleDelegate[] noiseJobs =
{
Job<Lattice1D>.ScheduleParallel,
Job<Lattice2D>.ScheduleParallel,
Job<Lattice3D>.ScheduleParallel
};


[SerializeField, Range(1, 3)]
int dimensions = 3;


protected override void UpdateVisualization(NativeArray<float3x4> positions, int resolution, JobHandle handle)
{
noiseJobs[dimensions - 1](positions, noise, seed, domain, resolution, handle).Complete();
noiseBuffer.SetData(noise);
}

噪声维度选择

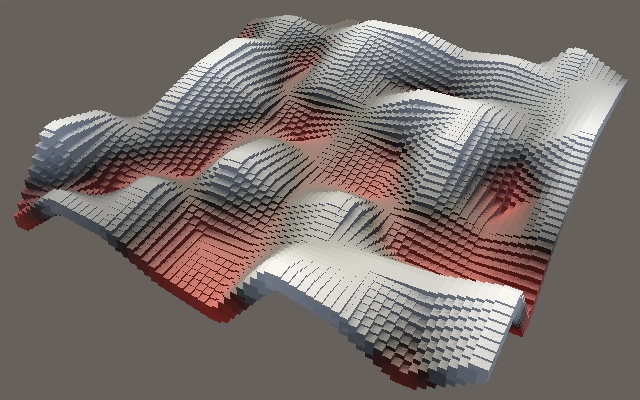
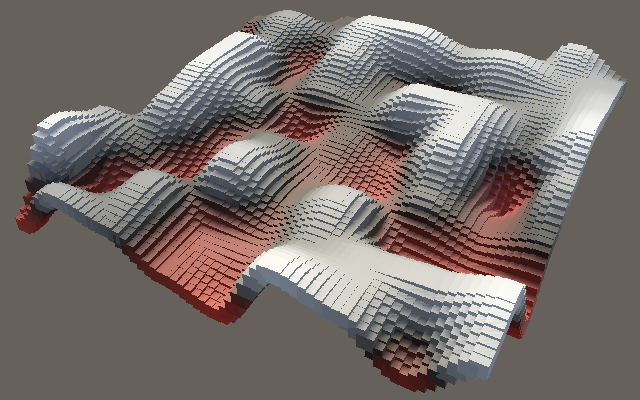
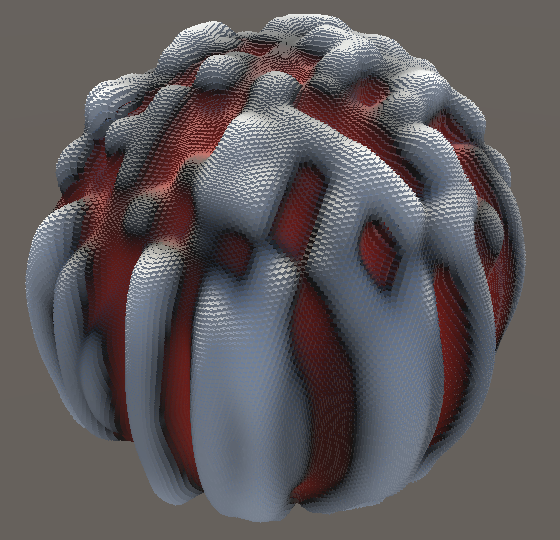
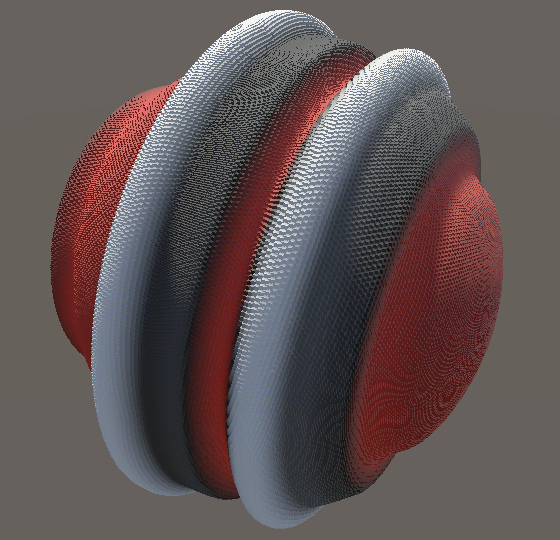
现在我们可以方便地看到不同的噪声函数所生产的效果,以及它们之间的区别.在使用球体等3D形状时是最明显的.
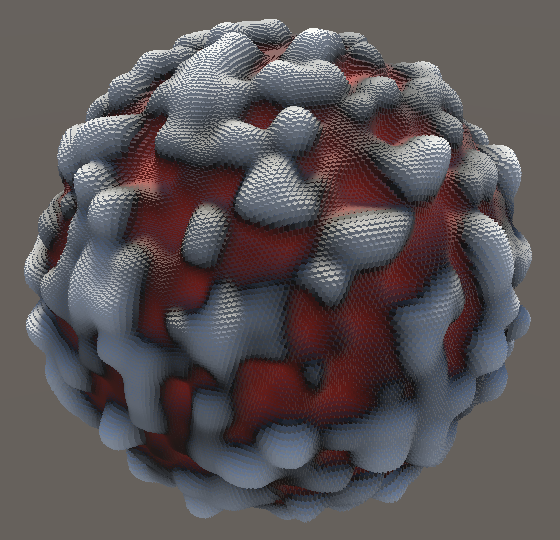
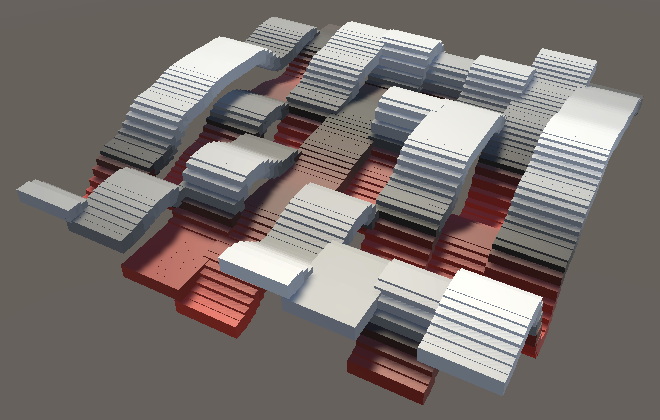
3D噪声 2D噪声 1D噪声

域缩放19


原文授权协议


原文项目仓库地址

我写的单CPU端萌新入坑版项目地址

伪随机算法系列-03 Value Noise(Lattice Noise)

https://tzkt623.github.io/2022/01/11/Pseudorandom Noise-03 Value Noise/

作者

特兹卡特(Tezcat)

发布于

2022-01-11

更新于

2022-01-20

许可协议